The boundary between stone and leaf
Premises
- This is GM read only.
- Combat takes place in the theater of the mind — driven by narration.
- Remember torches, food rations, statuses, clocks, and similar mechanics.
- Maintain an atmosphere of uncertainty and dread: dripping water in the distance, echoing footsteps, strange noises.
- Tests written like this: dexterity – status/k20 damage mean that on a partial success, the left-hand option applies, and on a failure, the right-hand one does.
- Let player create details of the story with question like: what makes you fear the inside of this chamber? What do you see that makes your hair stand on end? What do you feel when you think about descending into the tunnel’s darkness?
- Important - The adventure includes trait tests assigned to events (for example: perception — the P notices a message carved into a tree). These serve as aids for GMs not yet familiar with using moves, but they can be completely replaced by moves (as the system intends) and treated purely as guidance or reference.
- Map:
-
Introduction
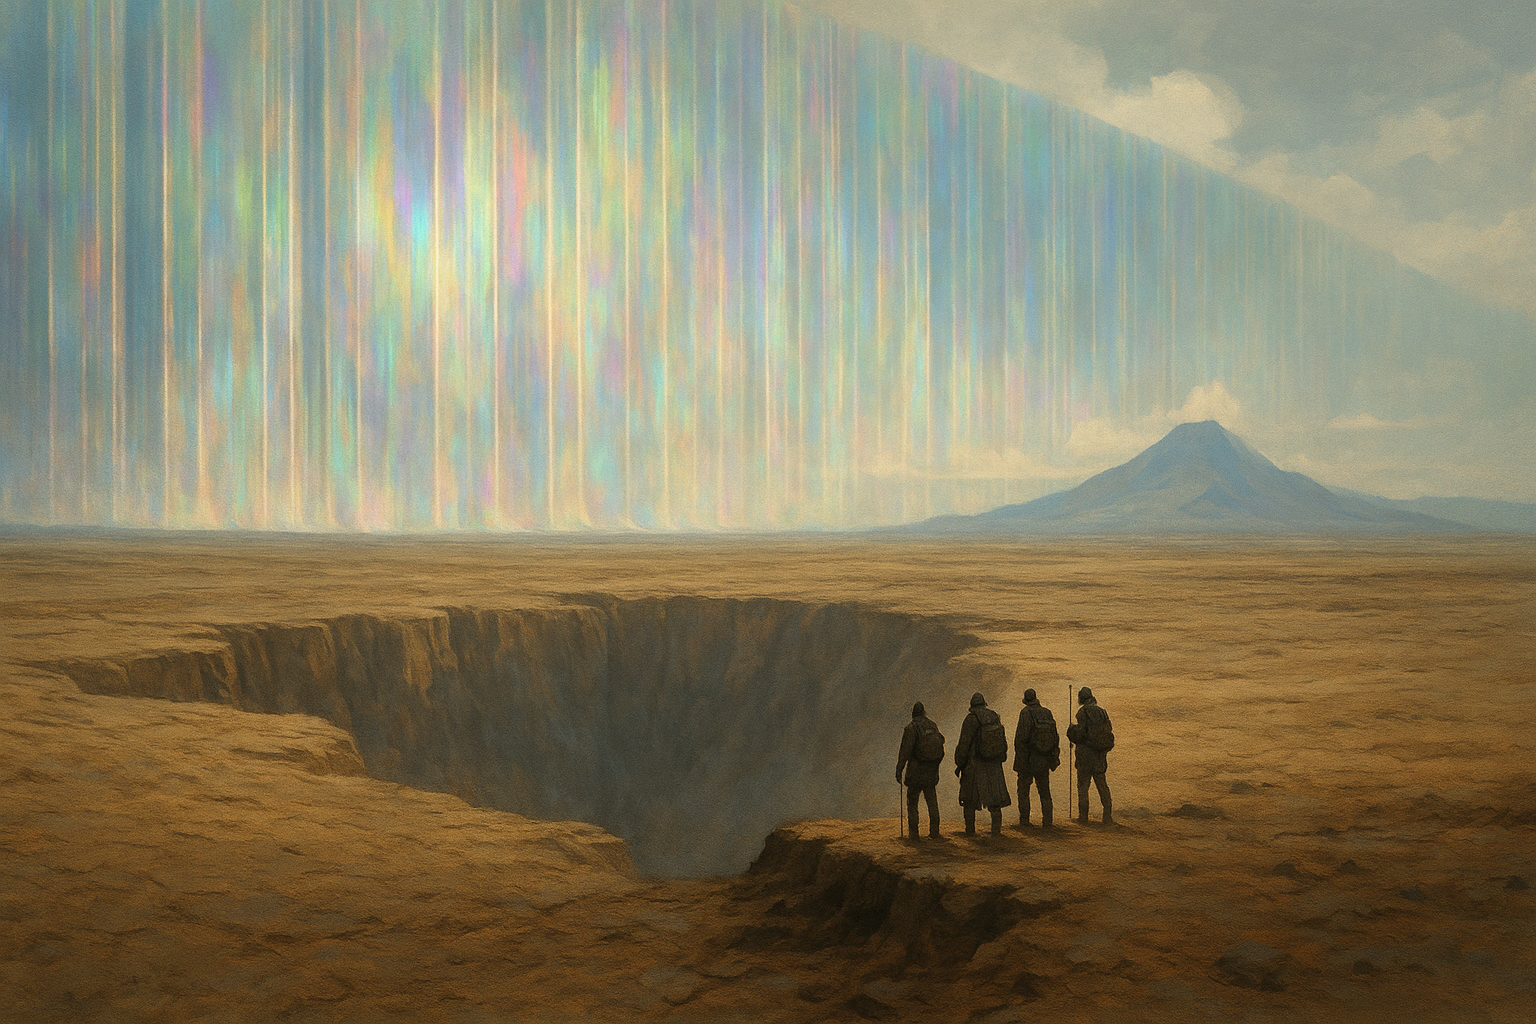
- The PCs have been tasked with exploring strange underground ruins beneath the impassable Aurora Wall — a horizon-spanning barrier that, up close, looks like sheets of colored glass — and mapping them in detail. The job comes from Lediusz, a minor local trader who discovered the site and demands 20% of any future profits in exchange for the information. Lediusz is with the PCs below the Aurora Wall.
- The group is in a desolate region between the Talking Mountain and the area cut off from the world by the Aurora Wall, which no one has ever crossed.
- The players will enter the prison of a druid who lived centuries ago, a figure who created transmutation crystals that allowed species and matter — magic and nature — to intermingle, in order to free evolution and life from their constraints.
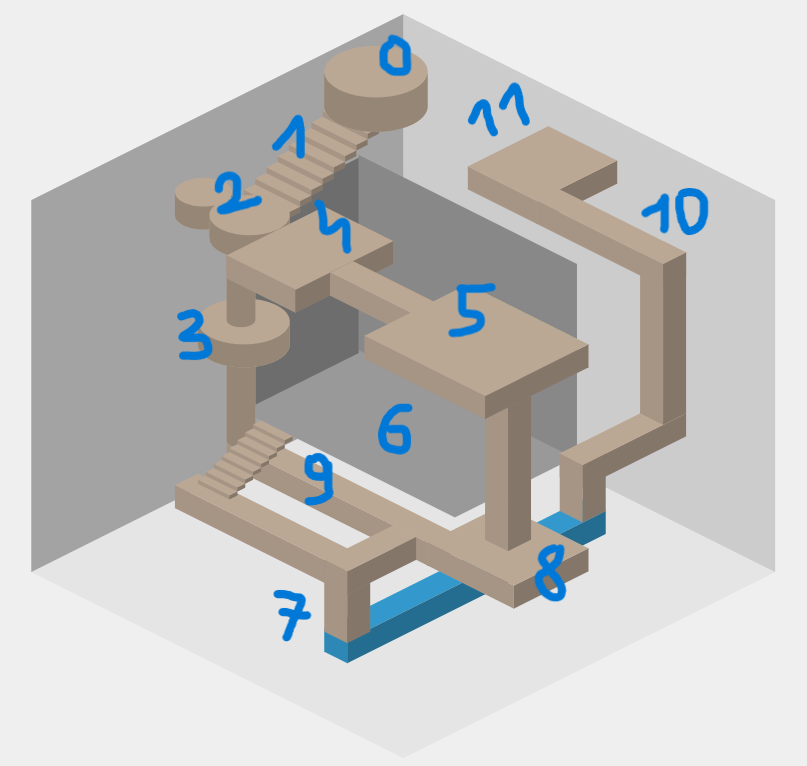
0 – Entry at the Fracture
- Aurora Wall – a colossal structure stretching from horizon to horizon; touching it (resilience) causes a temporary rash of stone/wood/steel/sand — random each time — every new contact results in a different outbreak.
- Very small, strange puncture marks on the ground — survival — tiny living stones with three legs hide in a crevice under a rock — they can bite, inflicting fatigue.
- Fissure in the ground, a collapsed fracture
- nature — looks like it was gnawed open.
- Leads to a round chamber with a stone sphere on a pedestal, split by a line running rightward from the symbol of sunrise, through the sun, then sunset, and ending at the moon.
- athletics — can be pushed, but only on a full success.
1 – Entry Corridor
- Walls: hieroglyphs (archaic Common) — mind — Here was sealed the one who crossed the boundary of stone and leaf…
- Large pit trap with a simple riddle: the password is JUMP (“What lifts you without wings?”). Stepping on the panel triggers the trap — dexterity — physical status/k20 damage.
- Iron doors
- investigation — a tiny pipe runs from the door into the wall — can be tracked using survival — leads to the sphere outside.
- disarming/opening — sleight of hand — you disarm/open it if you pay 2 fatigue / otherwise, the trap triggers and you suffer disadvantage against it.
- they look rusty and weak, but forcing them — athletics — triggers the trap.
- the trap — the sphere rolls off its pedestal through areas 2 and 3 (an open trapdoor doesn’t stop it), coming to rest in area 9 — dexterity — physical status/k20 damage.
- perception — at the bottom lies a scroll of flight (one person – 15 minutes of real-time use)
2 – Welcome Hall
- A massive hole in the floor — if the PCs look inside, they see the Goldsmith: a small sand-humanoid with one arm and one crystal eye.
- nature — his body is made of pure sand.
- He carries a key to the grate sealing room 10, a scroll of body elongation, and a potion of resistance (reduces all incoming damage by 5).
- Harmless, curious but skittish.
- If attacked, he flees through the tunnel from area 3 to 6.
- He’s been imprisoned here for over a decade but still hasn’t found the key to his cell.
- Speaks broken Common — his goal is to guide the PCs to a druid who can free him — through area 4 to avoid the bird, which he warns about.
- He’ll try to convince them by leaving a minor healing potion behind.
- If the PCs reject him, he follows them.
- The Goldsmith doesn’t know the crystal bird chick has the key in its beak — he hasn’t seen it yet. As soon as he does, he’ll start jumping and yelling: he must, must.
- Statues of five armored races arranged in a circle, forming letters with their fingers.
- The letters shown by the statues:
- human – U//V (hard to recognize), elf – O, dwarf – W, Lobo – S
- The statues’ hands must be adjusted so the letters, ordered by height from top to bottom, form the word Vows.
- Correct input opens a hidden chamber with an empty pedestal for a key and a plaque on the wall: “They belonged to those who fell fighting to return nature its rightful claim…”
- Rusted weapons and armor hang on the walls.
- A well-preserved two-handed hammer — on a 5–6 on the main die, it knocks the target prone (unless the target is twice the wielder’s size).
- survival — footprints from a few days ago can be spotted on the floor.
- The letters shown by the statues:
- On one wall, rusted iron doors with an inscription: Appearances deceive. So, from where to where does the sun travel in the sky?
- Attached to the doors are magnets with sunrise and sunset symbols, and in between them a central framed field — it looks like you’re supposed to press its center.
- To open the door without triggering the trap, press the empty field without using any magnet — the riddle is deceptive — the sun doesn’t really move across the sky; the movement is only apparent.
- Alternatively, can be opened with sleight of hand — 3 fatigue / failure triggers the trap — each attempt takes one minute.
- investigation — the lock is connected to a mechanism / a pipe runs along the wall to vents above the door.
- Trap — smoke pours from the vents and fills the room — immediately and then every minute of real time (use an hourglass), each affected character must make a resilience save or suffer fatigue.
- It’s possible to flee to area 9.
- If the door opens, the smoke spills into area 4 and ceases to be dangerous.
3 – Eroded Chamber
- An area gnawed out by living stones climbing up from area 9 toward the surface.
- It’s clear this space isn’t part of the original underground structure and didn’t exist back when this place was inhabited.
- nature — if the PCs have seen the living stones, they can deduce that this tunnel was likely carved out by thousands of such creatures working together.
- Goldsmith’s lair — inside:
- Gnawed sandstone chunks, two spears, and a balm.
- A crude drawing of area 6 with a marked pit and a large red skull; a bone field is visible, along with a small figure above which are question marks — a few drops of blood are also drawn on the image.
- In a thick layer of dust and rubble — perception — two broken tablets can be found. They were once part of the floor in area 2 before it collapsed due to the stone creatures. They show two words in hieroglyphs: We Offer and Here — a hint for the statue puzzle in area 2.
- A small patch of colorful Subterranean Reef grows on the wall — nature — if boiled and eaten (requires 1 hour of rest), it works like a herb.
- survival — beneath the wall is a section of smeared dust suggesting someone of medium size once slept here on a bedroll, but left no other trace — the signs look recent, though older than a day or two — a faint trail leads into a tunnel in the wall.
- Passage to area 6 — only a small creature fits, but crawling through is possible — takes 45 minutes and advances the Bird Clock.
- A hole leads down to area 9.
4 – Ledge with Mosaic
- A rocky ledge with a mosaic and a bridge crossing a chasm to another ledge. The chasm is too deep to see the bottom — only pillars jutting from the darkness are visible.
- Above the bridge, a massive inscription in archaic Common: BY THE POWER OF LEXARION, WE RETURN NATURE TO ITS ORIGINAL LAWS AND THE WORLD TO ITS ORDAINED ORDER. Below it, a huge illustration of scales: plants, animals, and intelligent races sit on one side; elements, ore (like steel), and minerals weigh down the other.
- religion — Lexarion is the universally known god of law — his rules apply to gods, mortals, nature, everything. Libra is his symbol.
- Puzzle:
- “Show me the water cycle.”
- Symbols: vapor, wind, rain, soil, body of water — they must be jumped on in that exact order.
- There are 5 rows with 5 symbols each — every row is identical.
- perception — the vapor symbol in the first row is clearly worn down.
- mind — a full success gives a hint toward the next symbol.
- Each incorrect choice causes part of the bridge to collapse:
- 1 error: -1 to the maximum result when rolling to jump to the far side;
- 2 errors: disadvantage on the jump;
- 3 errors: triggers a trap.
- When the bridge breaks, the crystal bird chick in the chasm below stirs and screeches — but it’s only visible with perception — something shiny glows between its teeth.
- The puzzle trap is a wave of water that pours from a wall opening and tries to wash everyone into the chasm — athletics/dexterity — you crash against the wall but don’t fall / physical status or fall and take k20 damage.
5 – Lair of Living Stones (Stone Bridge)
- Hundreds of living stones sleep here. In the center lie 2 rubies (one is gnawed — nature: they might be eating them) (worth treasure) and an arcane scroll (teleport yourself and any chosen adjacent creatures to a visible location — one use). Taking anything requires a dexterity test (2 fatigue or failure — the living stones awaken) — they form two “golems.”
- Golem (standard) — 6 HP and 4 armor — doesn’t attack, only tries to push targets into the chasm — physical status/k20 damage.
- A single group stealth test is needed to pass unnoticed; failure = the stones awaken.
- A vertical descent leads to area 8 (15 meters)
- A magical rune marks the hatch — it reads in archaic Common: Give me your blood if you believe the world should see this again.
- If a PC drips blood onto the rune, it turns into a red wave and instantly transports them to area 8, trapping them in a formalin-filled cistern where they begin to suffocate — see area 8. (Do not reveal this to others — narrate the outcome only after the scene plays out.) If another PC does the same, one lands atop the other, hindering each other and causing disadvantage.
- The rune can be pulled off or opened — athletics — but it does nothing unless fed blood.
- The hatch can be forced open — athletics, but a partial success awakens the living stones — or picked — sleight of hand.
- Climbing down/up — each character rolls athletics — 2 fatigue or physical status/k20 damage. Dropping a rope gives advantage.
- A magical rune marks the hatch — it reads in archaic Common: Give me your blood if you believe the world should see this again.
6 – Crystal Nest
- Falling into the nest awakens the chick, but it doesn’t locate the PCs immediately.
- Ground: bones + shattered wooden goats, branches, dense Blue Mountain Moss (nature — crystallizes water; rubbing it on your hands grants advantage on climbing).
- Pillars of an ancient temple; near one lies a crystal egg the size of a dog (worth treasure), very heavy; drinking its fluids restores full HP.
- Each pillar bears a violet eye like a druid’s.
- The eyes gaze at crossed-out, faded frescoes on the walls: a leaf with teeth / a heart made of earth and black blood / an apple tree with eyeballs drinking a deer’s tears.
- Inscription on the floor — survival — THESE EYES SAW THE WORLD IN A TWISTED WAY. WE FORBID THIS GAZE AND LIBERATE EXISTENCE FROM IT.
- Each pillar bears a violet eye like a druid’s.
- The Chick: crystalline, translucent, blind, with keen hearing; 12 HP (2 DMG per success); it cannot fly and can’t reach PCs on a pillar; has the cell key clenched in its beak (requires sleight of hand to snatch).
- When the Goldsmith sees the key, he shouts “must, must!” — start the Detection Clock.
- Each round, stealth test: partial success +1, failure +2 to the Detection Clock; at 4, the chick deals 2d6 to the last character who rolled.
- nature — the chick is a uniform crystal — unnatural.
- The Mother (much larger) returns when the Bird Clock fills; 20 HP (3 DMG per success); at 4 on her Detection Clock, deals 2d6 AoE damage.
- perception — near the humanoid corpses (one wears a poncho marked with the sigil of transmutation crystal — cultist of Maginature) lies a Scroll of Stone Transmutation.
- survival — a fresh corpse of a half-elf thief (helmet, small shield, medkit); came from area 3.
- A note: I’ve been here for days. Solved the statue puzzle in the welcome hall and took the hidden key. I can’t read the inscriptions, but it must guard something valuable. A sand-man with a crystal eye lurks here — he knows this place. I tried to catch him, failed; tomorrow I’ll crawl after him through the floor crack. I’ll tell you everything once I return, my love. We’ll be rich.
- Exits:
- Narrow sloped tunnel (45 min, +1 to Clocks) → area 9.
- Small portal (too narrow for the chick) → area 7.
- Tall fissure in the wall (45 min, +1 to Clocks) → area 3.
- Wide tunnel (1.5 h climb, +2 to Clocks) → surface — a high ledge: walking trees, “breathing” mountains, a golden sperm whale, a fleshy cloud, wooden goats, and emaciated elephantine beasts drinking from a pond and swelling. No safe descent — return trip takes 1 hour.
- investigation — the tunnel was carved by a larger beast.
- arcana — the dead merges with the living.
- nature — the beast hunts through this path — maybe it brings back spoils?
7 – Transmutation Crystal
- A corridor full of living stones; they don’t attack, mostly flee.
- A large blue crystal embedded in the rock — glows like the aurora:
- arcana — actively mutates the rock; small stones with legs break off from its surface.
- Smaller offshoots grow along the walls — nature — it seems like the crystal is reproducing — maybe it’s alive?
- investigation — can be cracked open in 4 hours; destroying it removes the surface barrier, kills the druid in the cell, and drives the Goldsmith into a frenzy (he violently opposes this and tries to intervene); +2 to Clocks.
- perception — a bundle of steel tubes runs from the core into the rock — (arcana) — it channels the crystal’s power to another mechanism; pulling the “cable” causes a mild tremor underground.
- In the crystal’s reflection, the PCs see their mutated forms; approaching it requires a will save:
- failure → psychological status (visions of eating sand, drinking sap, growing weeds);
- success → understanding the crystal’s function (everything nearby merges into one organism; longer exposure = unpredictable mutation) + a vision of a chained figure inside a mountain — the living stones are its creation.
- In the water swim Bladders — translucent creatures:
- One contains a small box with a necromancy scroll: Animate any dead creature as a servant for 24h.
- Two hold decaying fish; empty ones quiver — hungry, slowly approach the PCs.
- Feeding them lets the party pass; touching one requires a dexterity test, or it bursts.
- Bursting releases toxic gas (resilience: psychological status / 1d6 fatigue); if one bursts, all hungry ones detonate. If fed — they flee.
- Golden doors to a trap corridor:
- The Goldsmith shakes his head, warning of danger.
- The doors open by folding flat over the water; beneath them is a hidden tunnel to area 10 — lifting them again requires a full success in athletics.
- On the doors, a circle of 12 months; two movable symbols (half-sun / half-moon); inscription: “Tell me of the equinox.”
- Correct: align symbols with March (3) and September (9) → doors lay open toward area 7.
- Incorrect: the circle spins, a rune appears → random PC makes a mind save: psychological status / d20 damage; disarming the rune requires sleight of hand; the rune is undetectable before its first trigger.
- If the door drops suddenly, bladders pushed to the corridor’s end explode — the gas creates a chance to flee (e.g., to area 9).
- perception — the marsh floor is uneven (shallow/deep spots) — hidden underwater tunnel not visible from above; requires diving. If present, the Goldsmith points it out.
- Exits:
- Air tunnel under the golden doors → area 10.
- Land corridor with the bladders → area 9.
- Return to area 6.
8 – “Maginature Museum”
- Flooded Chamber
- Water reaches waist height (deeper than in the corridor from area 9, where it’s only knee-deep).
- On the wall, hieroglyphs — mind —: “Preserved distortions for eternal dread.”
- Three frescoes:
- A dwarf with a volcanic crust, blind, with antennae instead of eyes.
- A halfling with an ant’s torso and four arms, sleeping on a mound of similar beings.
- An earthworm covered in elven faces, gnawing on marshy soil.
- perception — a sealed stone compartment containing an invisibility scroll — like a drawer.
- Opening it — sleight of hand — you either retrieve the scroll but suffer a physical status / or suffer a physical status and the scroll is destroyed — the scroll is chain lightning (d20 single target or d8 to multiple).
- Four partially flooded cisterns with mutants in formalin (a mix of living and dead tissues):
- A tiger woven from electric discharges.
- A winged goat made of brass.
- A massive stone scorpion.
- One empty cistern filled with formalin — part of the trap from the hatch in area 5:
- The rune on the hatch (after blood is offered) teleports the target to this cistern — they immediately begin to drown — resilience — fatigue / 1d10 damage.
- Escape from inside: athletics — fatigue / physical status.
- It can be shattered from the outside using athletics with advantage — the trapped character suffers fatigue / physical status.
9 – Trap Corridor
- Goldsmith (if present) advises against entering this way.
- Corridor Appearance
- Oval, like a tunnel; gently slopes downward.
- Walls are punctured with holes the size of a human head.
- High enough for the sphere from area 0 to pass through; tool marks visible.
- Water reaches up to the knees of medium-sized creatures — difficult terrain.
- Traps – General
- perception — spotting the first thin slit in the ceiling — a full success reveals three more such slits, spaced evenly apart.
- Guillotine blades hidden in the slits trigger on movement.
- Disarm — sleight of hand — fatigue / triggers the trap and gives disadvantage on its effect.
- Passing under them — dexterity — physical status or 1d4 damage / 1d8 damage.
- Riddle Traps
- On the right wall, a question; on the left, arrows pointing down; on the floor, a 4-segment line (zones 1–4). A correct answer reveals the safe segment.
- Question 1: “How many states of matter?” → 4 (with plasma); nature — hints at including plasma.
- Question 2: “How many tides in a diurnal tide cycle?” → 4; nature — semi-diurnal pattern.
- Question 3: “How many primary types of rock?” → 3 (igneous, sedimentary, metamorphic). nature — e.g., igneous.
- perception — in a wall recess — a Potion of Silence — move silently, 6 dice on stealth, but can’t speak or hear.
- Question 4: “How many phases in complete metamorphosis of a butterfly?” → 4 (egg, larva, pupa, imago). nature — imago = fertile adult form.
- Blades retract after dropping.
- On the right wall, a question; on the left, arrows pointing down; on the floor, a 4-segment line (zones 1–4). A correct answer reveals the safe segment.
- Fear Rune (past the final blade, from area 8 side)
- Crossing the line → will save; anything less than a full success = forced retreat into the blades — you run through 2 / 3 blades.
- Chance to avoid unknown blades: 25% (1 on d4).
- Chance to recall known safe segments: 33% (5–6 on d6).
- Spotting something in the ceiling: perception; identifying the rune: arcana.
- Rune can be destroyed with a full success in aiming at range or athletics up close.
- If the party enters from area 8, the affected PC flips a coin to determine escape direction.
- The fear effect does not reveal the rune but allows a reroll of the perception check.
- Crossing the line → will save; anything less than a full success = forced retreat into the blades — you run through 2 / 3 blades.
- Additional Threat from the Wall
- Between the second and third blade — a larger hole — perception.
- A loose stone lies beneath — can be used to block the hole — athletics.
- After passing the first blade, four metallic scorpions (rat-sized) emerge; they climb walls, do not trigger traps.
- Scorpion — 1 HP, 1 damage.
- Each round, 3 more appear until the hole is sealed.
- Between the second and third blade — a larger hole — perception.
- Macabre Clue
- Near the third blade, a decayed, sand-like hand of the Goldsmith drops down; mind — reveals the owner. If Goldsmith is present, he recognizes it immediately.
- Hidden Golden Door to Area 7 — intuition.
- If present, Goldsmith points it out.
- When opened, the door folds toward area 7, blocking the underwater tunnel (adds disadvantage to perception to spot it).
- No handle: the door must be stroked or hugged. Dust hides the inscription: “Be gentle, friend.” Forcing it open doesn’t work.
- Water Tunnel (behind the golden door)
- One hour of swimming into the rock leads to a vast, raging jungle river — +2 to Clocks.
- Landing = suicide.
- Above the water floats a mist creature with a long mosquito-like nose; crystal-horned narwhals leap from the river — the party instinctively knows it must turn back (adds another hour).
- Below, larvae devour an old iron shield — if taken, they can chew through metal — sleight of hand — fatigue / psychological status.
- If the giant bird has not yet returned to its nest (area 6), it can be seen in the sky — perception.
- One hour of swimming into the rock leads to a vast, raging jungle river — +2 to Clocks.
- Sphere from Area 0
- If it rolled here and blocks the passage, it can be pushed — full success athletics.
- Rolling further, it crashes into the cisterns in area 8, breaking them and disabling one corridor blade (the first one) via vibration.
- If it rolled here and blocks the passage, it can be pushed — full success athletics.
- Map:
-
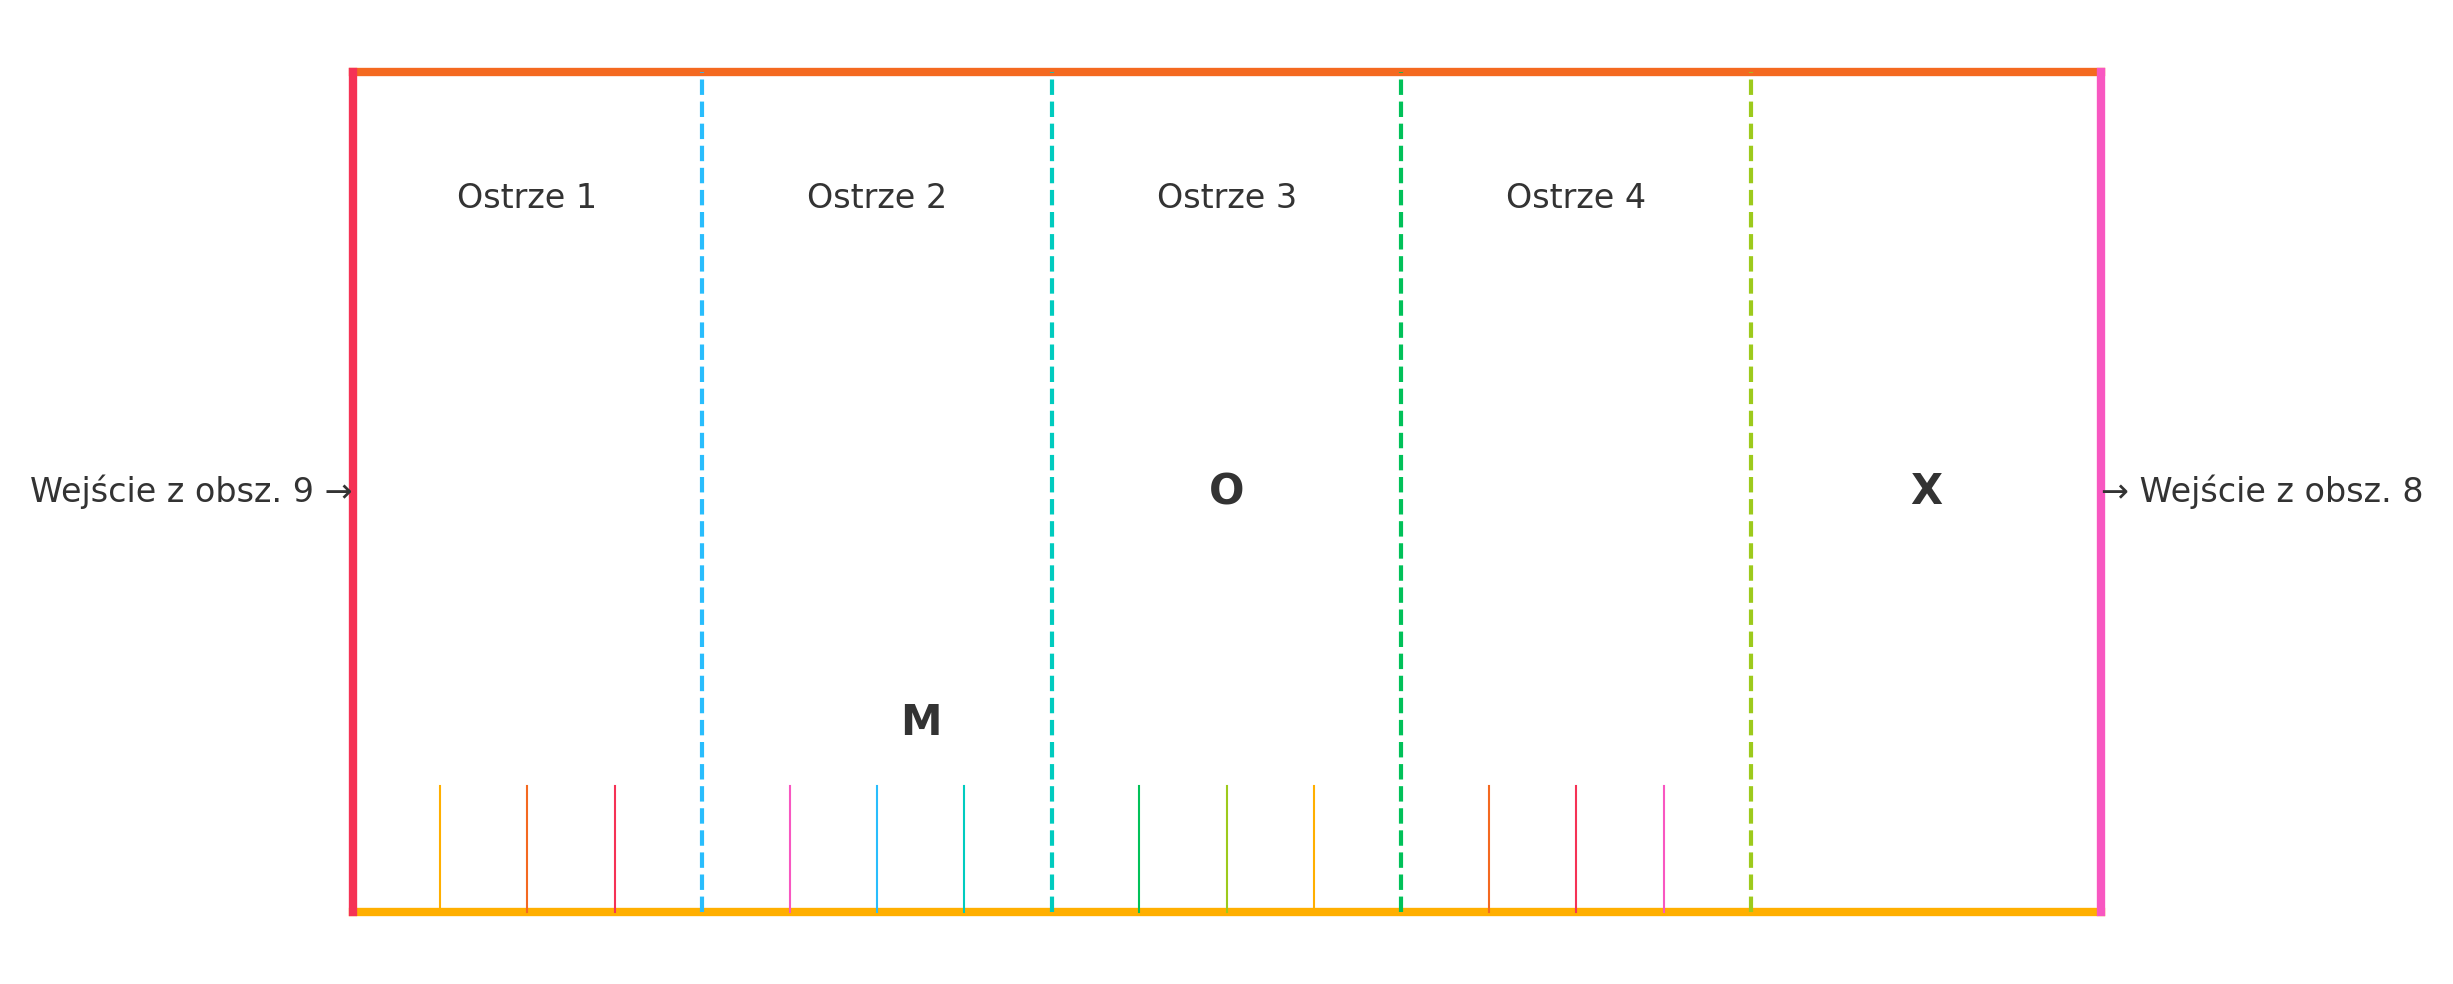
- M - elixir; O - scorpions pit, X - fear rune, Ostrze - blade, Wejście - entrance.
-
10 – Shaft before the Cell
- Vertical corridor (15 meters)
- At the top, a small yellow lantern-crystal; removing it provides constant light and gives disadvantage on stealth; removing it triggers a trap.
- Climbing up/down — each character rolls athletics — physical status / d20 damage. Dropping a rope from above grants advantage. If the Goldsmith is present, he climbs up and throws down a rope.
- At the top is a grate; the key is held by the Goldsmith. Without the key: sleight of hand / athletics — 2 fatigue / fall — 2d6 damage.
- Midway trap — narrow holes; investigation to detect.
- If the Goldsmith is present, he goes first and disables it.
- Sharp spikes react to light: destroying the crystal causes them to extend permanently and give disadvantage to passage; shining light into the holes while passing = no damage.
- mind / technology — allows understanding how the trap works.
- If a spike hits a PC — 1d4 / 1d8 fatigue.
- Goldsmith’s Scribbles (archaic Common, filled with errors):
- “Let the living merge with the dead…”
- “Magic is part of nature…”
- “Nature judges nothing…”
- “Still life is also nature…”
- “Abolish the body’s limits…”
- Goldsmith’s Belongings
- Edible berries + beet bulbs (from outside — the Goldsmith knows how to reach the Maginature side and can guide the PCs) — 1 food ration.
- Several identical worn ponchos hanging to dry.
- Smoke bomb — obscures the area — applies the BLINDED condition.
- Archive of Knowledge (collected books)
- The Goldsmith points “beyond the western wall.” A Maginature cultist (if present) recognizes these as sacred texts lost in the sand-flood.
- How to Free the Druid
- He powers the barrier.
- He must be replaced by an equally magical being (e.g., the Goldsmith, a spellcasting companion, a Maginature follower).
- Without a living replacement → the barrier will collapse.
- Do not remove the object behind his back — it may kill him.
- The cell key must have been kept somewhere in the complex.
- What is Maginature
- Nature altered by magic to merge living with dead and species with each other; results of the transmutation crystal and experiments by the druid Qelivenda.
- Blue Transmutation Crystal (as in area 7): exposure → dead tissue merges with the living.
- Orange “Fertility Crystal” (not present here): within 1 km over 1d4 months → species become cross-fertile.
- What is the Barrier
- A wall blocking the spread of Qelivenda’s crystals.
- Powered by a large crystal and a ritual forced on the prisoner in the cell.
- Each spell cast extends the prisoner’s life; his death = the end of the barrier.
- Cell Grate
- Opening it: sleight of hand / athletics — fatigue / physical status.
- The key is held by the chick in the crystal nest (area 6).
11 – The Druid’s Cell
- An aurora-like glow radiates from the chains binding the figure (the PCs feel the presence of arcane energy).
- Wall frescoes (faded):
- A stone with eyes mating with a winged leaf.
- Capture of a tall figure, chains forged in a dwarven smithy, being led underground.
- Gnome engineers connecting machinery to a blue crystal — tubes in the wall.
- A sealing ritual; the prisoner emits an aurora.
- Beings later stand on a hilltop, gazing at a massive wall of aurora.
- Final scene: an ordinary stone beside an ordinary leaf.
- Random spell scroll in a wall niche behind the prisoner — removing it kills the one bound in chains.
- Goldsmith’s clue: the great bird sometimes brings people to its nest — they could replace the prisoner if the group refuses to sacrifice one of their own. If the PCs choose to return for such a person, fast-forward the journey to the crystal nest and give each 1 fatigue; the return trip is fast-forwarded without penalty.
- Further path behind the prisoner: a leafless tree on a hill before the aurora wall.
- mind — it matches the hill from the frescoes.
- Entry is possible only after painting leaves with blood; the image comes to life, return becomes impossible.
- Plaque reads: “Red life paints green. This is a one-way journey.” (the tree blooms in the fresco).
- Tubes in the walls connect to the chains.
- intuition — identical to the ones seen in area 7, connected to the Transmutation Crystal.
- Partially damaged — investigation — some energy leaks into mutations.
- technology — repairing the tubes reduces further mutation.
- Freeing the prisoner
- A key lies on a pedestal in front of the prisoner; inscription: “You have already broken all taboos to get here. This is the last. The key to the coffin of the old order and the laws of reality.”
- investigation — reveals an electrical trap — it can be bypassed by placing something of equal weight, but requires a full success in sleight of hand.
- Taking the key: 1d20 lightning damage (ignores armor).
- Chains slide off easily — the key is not required — but another magical being must be chained immediately or the aurora will begin to fade — perception: the light weakens.
- A key lies on a pedestal in front of the prisoner; inscription: “You have already broken all taboos to get here. This is the last. The key to the coffin of the old order and the laws of reality.”
- The Prisoner
- Appears to be a young, naked elf; veins of living gold; violet eyes.
- Bound from the waist down, torso, breasts, neck, and lower face encased in metal restraints connected to the cell’s mechanisms — gender is obscured. Sources disagree whether it’s Quelivend or Quelivenda.
- Claims to be a student of Quelivenda, whom she freed; actually lying — it is Quelivenda.
- Full success in intuition reveals the lie.
- In response to violet eyes: “Everyone has them on the Heather Isles” (hesitates).
- Says she freed Quelivenda — when? Doesn’t know how much time has passed — the crystal’s power prevented aging. Speaks of it with difficulty — torn between hatred and exhaustion. She found her, believing in Maginature, released her from the chains. But Quelivenda immediately deceived her and swapped places — she doesn’t know why. The last words she remembers were: “As long as they believe I’m here, they won’t interfere with my tampering in the crucible of matter.” Then she left. Latra had to put the key back and fake the scene.
- She gives the name Latra.
- Asks for clothing after being freed.
- Describes Maginature as beautiful — the liberation of life’s full potential. Beyond the aurora wall, there are civilizations, though life is hard among the bizarre creations of mixed species and matter. Maginature is a blend of contexts — meat clouds, crawling tears — initially frightening, but truly the breaking of boundaries and a path to evolutionary freedom.
- The crystal’s power prevented her from aging and forced her hands to perform magical gestures every few hours to maintain the aurora wall.
- If the PCs free her but refuse to let her go:
- A fight breaks out in the cell or on the hill behind the blood-painted mural (if the painting was completed beforehand, she flees there immediately after freeing herself; if not, she paints the leaves in blood and enters).
- Quelivenda — 10 HP — casts spells without fatigue cost, using 4 nature dice — roll 1d4; on a 4, she acts freely and chooses how to target the group.
- The party can always flee — the druid remains free.
- A fight breaks out in the cell or on the hill behind the blood-painted mural (if the painting was completed beforehand, she flees there immediately after freeing herself; if not, she paints the leaves in blood and enters).
- Result of barrier collapse (if no replacement source is found):
- An earthquake opens a path: a jungle of mutants floods into the civilized world.
Clocks
- Clocks advance by one tick after each team short rest, by four ticks after a long rest, and proportionally after time-consuming decisions (some of which are specifically mentioned in the text).
Bird Clock
After 3 clock advances, the chick’s mother in area 6 returns from hunting to feed her offspring. Wherever the PCs are, they hear the deafening screech of the bird echoing through the entire underground. Once back, the great bird will not leave to hunt again until the following morning.
- The bird brings the chick an intelligent humanoid (two total — one devoured instantly, the other trapped in the nest’s branches), originating from beyond the western barrier.
- His name is Ariwandi. He has green moss in place of hair, absorbing and filtering moisture so he can drink fog and rain. His torn companion, Lupik, looked the same. Both hail from the same tribe — the Mossfolk — living in a section of the Great Jungle Reef (a reef-like jungle that grows over land).
- Ariwandi claims to be a follower of Maginature and prays for the collapse of the barrier blocking the West, so the work of the great messiah Qelivenda may expand its reach, and the people of the West may reconnect with the world.
- PCs understand that if he leaves, he’ll tell his people to come and explore the place — he may have accidentally found the prison of the great druid.
- He believes sacrificing himself to free Qelivenda is something he should do, but doesn’t want to — because he’s afraid.
Freak Clock
After 2 clock advances, a Maginature creature wandering the prison attacks the PCs. It entered via the water tunnel in area 9.
- The creature is a massive fungal horror — 12 HP, 2 armor, regenerates 3 HP per round; each round, on a 6 on d6, it spawns a 5 HP clone.
- Approaching it requires a resilience test until a partial success is rolled (spore cloud) — failure = 1 fatigue / psychological status.
- Deals 2 damage per success.
Barrier Spell Renewal Clock
After 4 clock advances, the entire underground shakes as a surge of power flows through it. This burst from the transmutation crystal mutates both the living and the dead within a wide radius.
- Each PC rolls a Constitution 10 save — on failure, they mutate according to the table below (roll d12):
- Extra small finger on the left hand
- Split tongue
- Freckles made of iron
- Hair replaced by seaweed
- Skin turns reddish
- One eye turns completely white
- Coral reef growth on the neck
- Small spines along the spine
- Webbing between fingers
- Horn growing from forehead
- Transparent torso — internal organs visible
- Stone patches spread across the body